15 Tips For Halter Breaking Calves
|
I have shown cattle for sixteen years, and have been very blessed to have found many successes. However, if there’s one thing I’ve learned, it’s that the buckles don’t come just from work done at the shows—it takes countless hours of behind the scenes feeding, fitting, growing, and practicing to get the placing you want. I’ve halter broken many different kinds of calves, from those that drag you clear across the barn to those that follow along as if it’s nothing from day one, but, through the years, I’ve found certain tricks that seem applicable to the majority of animals. I wanted to write this blog post to share these and hopefully help anyone who’s just getting started, or has a pesky calf that simply won’t cooperate. Please know that all of this is my opinions and what I’ve found works for me. If you have other methods, feel free to head on over to my social medias and tell me about them! Anyway, here’s my 15 tips for halter breaking cattle.
|
|
1. Leave the calf tied up 24/7.
Do not set the calf loose until they have been on halter for at least two to three weeks and you’re confident they’re halter broken. This makes the calf completely dependent on you for food and water. Twice a day, walk the animal to water and, while it’s drinking, clean its area, and give it fresh feed and hay, then walk it back. The first couple of days, the chances it will walk calmly straight where you want it are not too high. Be patient, it’ll figure out the dance. However, if it continues to be stubborn and aggressive past the first couple of days, tie it head high and deny it food and water. It will not die, I promise! Every time it does good, reward it with the normal routine. Every time you feel the calf is being unnecessarily difficult, tie it up and make it stand for a few hours before you try again. The calf will learn that, when it does what you want, you’ll do what it wants by giving it water and a place to lie down with food, and will start to work with you. Unfortunately, it sometimes does require tough love in the beginning, but cattle are smart. They catch on, and they’re usually eager to please.
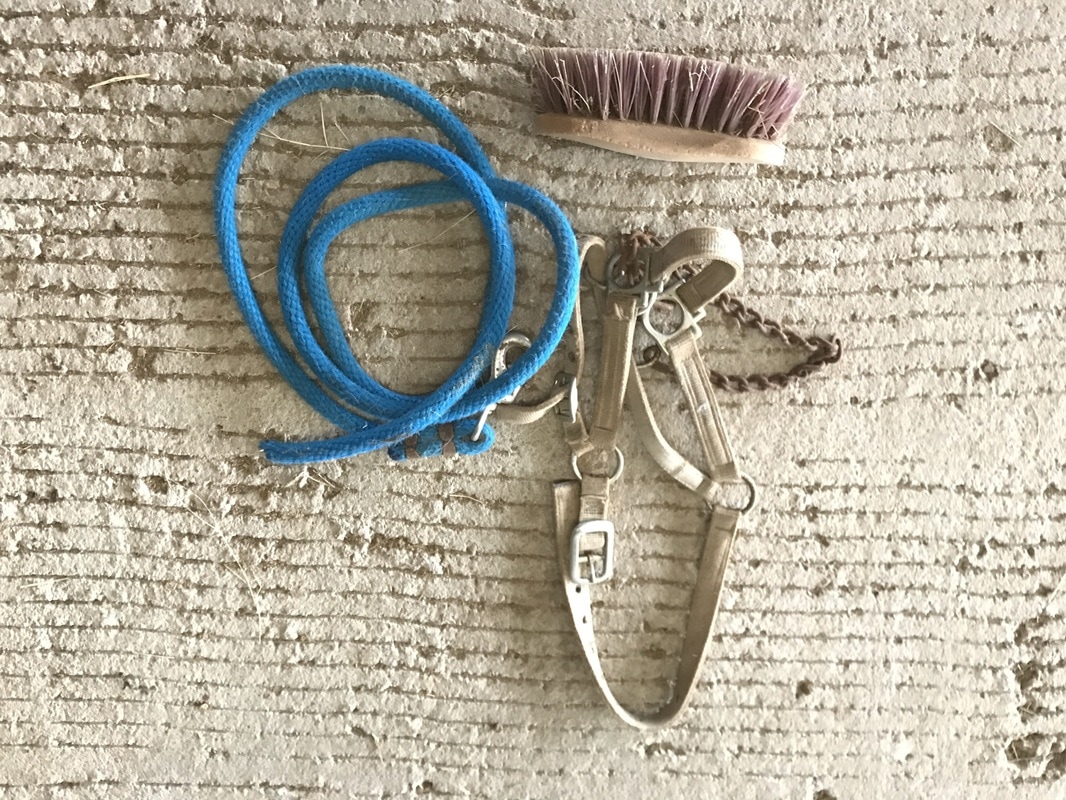
2. Use a nylon halter with a control chain… never a rope halter!
I personally recommend the Valhoma control halter with a chin strap. This isn’t sponsored, that’s honestly what my family uses. By the time most calves get a halter on them, they weigh more than we do, and a chain is an indispensable tool. If the calf is extra stubborn, just give the lead rope attached to that chain a good pop, and it will get their attention. Sometimes, the chain below the jaw will cut through the skin, and that is grounds for medicating and setting them loose for a few days, but only until it heals. So many people halter break with rope halters, then, when they head to the ring with their shiny new leather show halter on, it’s the first time the calf has ever experienced this shiny, jingly new contraption under their jaw, and they freak out! I never even put a rope halter on cattle until they’re at least a few years old and I trust them 100%.
3. Work towards touching every inch of the calf.
Start petting at the shoulder blades right behind the neck. When you feel comfortable enough, move slowly to other parts of the body. After the first couple of days, you should be able to walk up to the calf and touch any single body part including the legs, tail, face, and stomach. This is an integral part of forming a relationship with the animal that you’re probably going to be spending several years with. Investing extra time early pays off in the long run.
4. Talk to the calf.
Like most animals, cattle pick up on tone of voice, and, if you can talk calmly to it, no matter what you’re saying, it will more readily trust you. So chat about the weather. Chat about the day you’ve had. Chat about a movie you watched. People may give you weird looks, but I promise this is beneficial! You have nothing to worry about unless the calf starts chattin’ back….
5. Check the halter frequently.
Calves being halter broken are usually growing very fast. Just because the halter fits when you put it on doesn’t mean it’s still the right size a week later. Double check that it’s not cutting into their skin; behind the ears is a place of specific concern. This can be extremely painful and actually leave lifelong scars if left untreated. If you start to see the hair being rubbed off, make the halter bigger. If it does start cutting into the skin and leaves an open wound, treat the area immediately. If severe enough, you may have to let the animal lose for a few days to heal.
6. Don’t put the halter on too low.
You want the nose piece of the halter to fall no more than one or two inches below the eyes. If it’s too low, when you pull on the lead, it can restrict their nasal cavity and cause them not to be able to breath. This will cause them to think they need to fight for their life, and they’re liable to become aggressive. I’ve seen many people think that their calf is naturally mean or in-cooperative, when they really just had the halter too low. Usually, pulling it up higher immediately fixed the problem. The importance of a well-fitting halter cannot be overstated.
7. Be understanding and patient.
This is a completely new experience for the young animal. Chances are, a halter was put on the calf not long after it was weaned, branded, vaccinated, and, if it’s a steer, castrated, which can all be extremely stressful events. Always move slowly around the calf and talk with a calm voice. If you continue to struggle getting the calf to trust you or cooperate, try a different approach. Signs of irritation or discomfort in cattle include swishing the tail continuously, pulling back on its lead rope, refusing to lay down, and anxiously tracking back and forth. Be willing to stand there until the calf relaxes before you move any closer.
8. It’s not going to be pretty for a while.
It’s normal for calves to lose some weight during the first couple of weeks as they adjust to such a different lifestyle, and this is also the time when they can be experience some pretty major growth stages. If you thought it was a good calf when you put a halter on it, but are now seeing some questionable changes, wait a few weeks for it to regain its original form.
9. Cattle are creatures of habit.
Consistency is key. I realize that life is super busy and that the calf is surely not your only commitment, but try your best to feed every day at the same times. If you’ve ever watched cattle in the pasture throughout a few weeks, you’d notice that they walk to the same places at the same time each day. By creating this routine that the calf can learn and count on, you are giving it the structure it needs to be healthy. As crazy as it sounds, you can actually help your calf put on an extra few pounds just by having it on a metabolic schedule.
10. The best time to halter break is at six months of age.
I say this because it’s usually when beef calves are weaned. Some calves who have been at side while their dam was on halter already have experience with the lead, but I personally don’t recommend taking the calf away from its mom just to halter break it. Also, anything past one year of age is getting a little too old, and there’s increased risk to the trainer.
11. Go ahead and start show feed.
Find a brand and mixture of feed that will be high performing. To be frank, if you’re not willing to put the money into good feed, then don’t expect to win. If at first the calf doesn’t respond well to the feed you choose, give it some time. Don’t sporadically change feeds. If you do feel it’s essential to change their diet, do so slowly while mixing the old feed and the new feed until you make a complete transition. You can severely damage cattle’s digestive system by changing their feed too fast. I recommend starting the animal on show feed as soon as you get it on halter so that it can get an early start on growing.
12. Leave a radio playing.
When you take the calf to the stock show, it is going to be surrounded by so many bizarre noises, smells, and sights, and it will more than likely feel very overwhelmed. It’s really hard to re-create that environment beforehand, but, by leaving a radio playing, even when you’re not in the barn, the calf gets used to hearing human voices and foreign sounds. I’m sure every animal is different, but mine prefer the oldies: Patsy Cline and Hank Williams are their all-time favorites.
13. Practice with the show stick before you get to the show.
Okay… so I may not be the best about this one… and it’s probably the one that seems the most common sense. However, it can be very easy to focus so much on making sure the calf follows good and is comfortable with human interaction that you forget to touch it with the stick. More than a few times, I’ve had the awful realization that the calf I’m holding in make ready has never met this long, scratchy doohickey. When you first touch the calf, it’s liable to jump and maybe even call you a rude name. That’s normal! Be patient, and continue scratching until the calf gets used to it. Practice moving the feet, as well. It takes the calves a while to learn how you want their legs set, but, if you keep at it and practice often, you’ll more than likely be able to walk them into place… and that will get you showmanship bonus points.
14. Have someone watch you set the calf up.
We’re all guilty of thinking that our animal is the best in the world and is deserving of Grand Champion. But the truth is that every animal has flaws. Bring in someone who knows about cattle but who doesn’t see your calf on a regular basis, and set the animal up in front of them as if you were in the show ring. They will be able to tell you things that you might not see otherwise and how to fix them. For example, maybe the hind legs hock in if you place them too far apart. Or maybe the back breaks if you hold the head too high. Figuring out how to avoid these things beforehand will move you up a few places in the class.
15. Not every calf is breakable.
Every calf is different and there’s certainly not a one-size-fits-all method. Some calves just aren’t about the show life. If you’ve worked and worked with the calf, but still don’t feel you’re making progress, it’s nothing you’ve done wrong. Definitely seek a second opinion or maybe have someone else work with the animal or suggest a different approach before giving up, but some calves just won’t cooperate, no matter how hard you try.
I hope this helps! If you have any questions, don’t hesitate to hit me up on social media or shoot me an email! All of that can be found on my home page.
Do not set the calf loose until they have been on halter for at least two to three weeks and you’re confident they’re halter broken. This makes the calf completely dependent on you for food and water. Twice a day, walk the animal to water and, while it’s drinking, clean its area, and give it fresh feed and hay, then walk it back. The first couple of days, the chances it will walk calmly straight where you want it are not too high. Be patient, it’ll figure out the dance. However, if it continues to be stubborn and aggressive past the first couple of days, tie it head high and deny it food and water. It will not die, I promise! Every time it does good, reward it with the normal routine. Every time you feel the calf is being unnecessarily difficult, tie it up and make it stand for a few hours before you try again. The calf will learn that, when it does what you want, you’ll do what it wants by giving it water and a place to lie down with food, and will start to work with you. Unfortunately, it sometimes does require tough love in the beginning, but cattle are smart. They catch on, and they’re usually eager to please.
2. Use a nylon halter with a control chain… never a rope halter!
I personally recommend the Valhoma control halter with a chin strap. This isn’t sponsored, that’s honestly what my family uses. By the time most calves get a halter on them, they weigh more than we do, and a chain is an indispensable tool. If the calf is extra stubborn, just give the lead rope attached to that chain a good pop, and it will get their attention. Sometimes, the chain below the jaw will cut through the skin, and that is grounds for medicating and setting them loose for a few days, but only until it heals. So many people halter break with rope halters, then, when they head to the ring with their shiny new leather show halter on, it’s the first time the calf has ever experienced this shiny, jingly new contraption under their jaw, and they freak out! I never even put a rope halter on cattle until they’re at least a few years old and I trust them 100%.
3. Work towards touching every inch of the calf.
Start petting at the shoulder blades right behind the neck. When you feel comfortable enough, move slowly to other parts of the body. After the first couple of days, you should be able to walk up to the calf and touch any single body part including the legs, tail, face, and stomach. This is an integral part of forming a relationship with the animal that you’re probably going to be spending several years with. Investing extra time early pays off in the long run.
4. Talk to the calf.
Like most animals, cattle pick up on tone of voice, and, if you can talk calmly to it, no matter what you’re saying, it will more readily trust you. So chat about the weather. Chat about the day you’ve had. Chat about a movie you watched. People may give you weird looks, but I promise this is beneficial! You have nothing to worry about unless the calf starts chattin’ back….
5. Check the halter frequently.
Calves being halter broken are usually growing very fast. Just because the halter fits when you put it on doesn’t mean it’s still the right size a week later. Double check that it’s not cutting into their skin; behind the ears is a place of specific concern. This can be extremely painful and actually leave lifelong scars if left untreated. If you start to see the hair being rubbed off, make the halter bigger. If it does start cutting into the skin and leaves an open wound, treat the area immediately. If severe enough, you may have to let the animal lose for a few days to heal.
6. Don’t put the halter on too low.
You want the nose piece of the halter to fall no more than one or two inches below the eyes. If it’s too low, when you pull on the lead, it can restrict their nasal cavity and cause them not to be able to breath. This will cause them to think they need to fight for their life, and they’re liable to become aggressive. I’ve seen many people think that their calf is naturally mean or in-cooperative, when they really just had the halter too low. Usually, pulling it up higher immediately fixed the problem. The importance of a well-fitting halter cannot be overstated.
7. Be understanding and patient.
This is a completely new experience for the young animal. Chances are, a halter was put on the calf not long after it was weaned, branded, vaccinated, and, if it’s a steer, castrated, which can all be extremely stressful events. Always move slowly around the calf and talk with a calm voice. If you continue to struggle getting the calf to trust you or cooperate, try a different approach. Signs of irritation or discomfort in cattle include swishing the tail continuously, pulling back on its lead rope, refusing to lay down, and anxiously tracking back and forth. Be willing to stand there until the calf relaxes before you move any closer.
8. It’s not going to be pretty for a while.
It’s normal for calves to lose some weight during the first couple of weeks as they adjust to such a different lifestyle, and this is also the time when they can be experience some pretty major growth stages. If you thought it was a good calf when you put a halter on it, but are now seeing some questionable changes, wait a few weeks for it to regain its original form.
9. Cattle are creatures of habit.
Consistency is key. I realize that life is super busy and that the calf is surely not your only commitment, but try your best to feed every day at the same times. If you’ve ever watched cattle in the pasture throughout a few weeks, you’d notice that they walk to the same places at the same time each day. By creating this routine that the calf can learn and count on, you are giving it the structure it needs to be healthy. As crazy as it sounds, you can actually help your calf put on an extra few pounds just by having it on a metabolic schedule.
10. The best time to halter break is at six months of age.
I say this because it’s usually when beef calves are weaned. Some calves who have been at side while their dam was on halter already have experience with the lead, but I personally don’t recommend taking the calf away from its mom just to halter break it. Also, anything past one year of age is getting a little too old, and there’s increased risk to the trainer.
11. Go ahead and start show feed.
Find a brand and mixture of feed that will be high performing. To be frank, if you’re not willing to put the money into good feed, then don’t expect to win. If at first the calf doesn’t respond well to the feed you choose, give it some time. Don’t sporadically change feeds. If you do feel it’s essential to change their diet, do so slowly while mixing the old feed and the new feed until you make a complete transition. You can severely damage cattle’s digestive system by changing their feed too fast. I recommend starting the animal on show feed as soon as you get it on halter so that it can get an early start on growing.
12. Leave a radio playing.
When you take the calf to the stock show, it is going to be surrounded by so many bizarre noises, smells, and sights, and it will more than likely feel very overwhelmed. It’s really hard to re-create that environment beforehand, but, by leaving a radio playing, even when you’re not in the barn, the calf gets used to hearing human voices and foreign sounds. I’m sure every animal is different, but mine prefer the oldies: Patsy Cline and Hank Williams are their all-time favorites.
13. Practice with the show stick before you get to the show.
Okay… so I may not be the best about this one… and it’s probably the one that seems the most common sense. However, it can be very easy to focus so much on making sure the calf follows good and is comfortable with human interaction that you forget to touch it with the stick. More than a few times, I’ve had the awful realization that the calf I’m holding in make ready has never met this long, scratchy doohickey. When you first touch the calf, it’s liable to jump and maybe even call you a rude name. That’s normal! Be patient, and continue scratching until the calf gets used to it. Practice moving the feet, as well. It takes the calves a while to learn how you want their legs set, but, if you keep at it and practice often, you’ll more than likely be able to walk them into place… and that will get you showmanship bonus points.
14. Have someone watch you set the calf up.
We’re all guilty of thinking that our animal is the best in the world and is deserving of Grand Champion. But the truth is that every animal has flaws. Bring in someone who knows about cattle but who doesn’t see your calf on a regular basis, and set the animal up in front of them as if you were in the show ring. They will be able to tell you things that you might not see otherwise and how to fix them. For example, maybe the hind legs hock in if you place them too far apart. Or maybe the back breaks if you hold the head too high. Figuring out how to avoid these things beforehand will move you up a few places in the class.
15. Not every calf is breakable.
Every calf is different and there’s certainly not a one-size-fits-all method. Some calves just aren’t about the show life. If you’ve worked and worked with the calf, but still don’t feel you’re making progress, it’s nothing you’ve done wrong. Definitely seek a second opinion or maybe have someone else work with the animal or suggest a different approach before giving up, but some calves just won’t cooperate, no matter how hard you try.
I hope this helps! If you have any questions, don’t hesitate to hit me up on social media or shoot me an email! All of that can be found on my home page.
Share this:
